Miraplacid Text Driver 4.1 User's Manual
| |
|
Miraplacid Text Driver 4.1 User's Manual
|
Start Text Extraction
To start new text extraction, open a document with printing-supported application
and print the document

In the "Print" dialog select "Miraplacid Text Driver"
in a "Select Printer" ("Printer Name") box and click "Print"
Alternatively, you can drag and drop a document to Miraplacid Text Driver desktop icon.
Registration Dialog
If you have not registered the Miraplacid Text Driver yet,
the first thing you will see will be Registration Dialog
If you are not going to register the product right now, just click "Continue" button.
If you want to buy the product, click "Buy Online".
If you have purchased the product and received registration code,
enter your first name, last name and the registration code you got and click
"Register" button. First name, last name and registration code are case sensitive.
Registration Window will disappear after product registration.
Miraplacid Text Driver Dialog
The next step is Miraplacid Text Driver Dialog. It contains preview window, information controls, configuration controls and buttons described below.
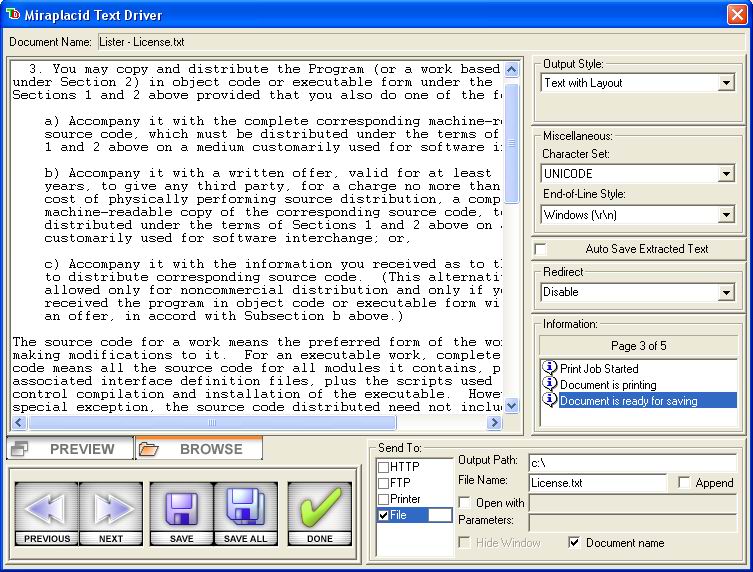
Document Name and Information window
The name of the document you printed is displayed in the very top of the dialog.
Information list box on the right side displays current state of the Miraplacid Text Driver and activity history.
Preview Window
Large Preview Window on the left side of the dialog displays extracted text.
Preview window displays one page at a time. If the document you printed has multiple pages,
"Next" and "Previous" buttons help you to navigate through the pages.
You can edit the text in the preview window and save changes to disk,
but changing "Output Style" causes text re-formatting and loss of all the changing you made.
Miraplacid Text Driver will warn you in all the situations when you can possibly loose your changes.
Navigation
 
Use "Previous" and "Next" buttons to navigate through the pages in multiple-pages document.
Redirect
This option allows you to print original document to the selected printer. Using Redirect, you may get your document to be transparently printed to your physical printer.
Hovewer, this method has the following particular features:
- Printer should be PCL5 HP compatible
- Document will be printed with Text Driver settings (resolution and paper format)
Please, note that this setting change will work only from the next print job.
Output Style
There are two output styles - Plain Text and Text with Layout. Plain Text output just joins all t
he text on every line. You can specify a delimiter to separate strings.
If your extracted text stick together, try to type blank character in the delimiter textbox.
Text with Layout output makes the output text looks
like the original document. It is useful for tables and diagrams conversion.
Additionally, Miraplacid Text Driver contains XML output format. This format can be used by
advanced users for custom text processing and formatting.
Character Set
It is recommended to use ANSI Latin-1 Windows character set for ASCII output unless you need non-English characters support. Besides, you can save output text as Unicode.
End of Line Style
It is recommended to use "Windows" End-Of-Line style unless you preparing a text file to be used on Unix.
Send To
You can choose several destinations at the same time. For example, you can save text to disk and print it to a real printer.
File
Saves text to disk. You can use File Browser to specify file location.
You can specify file name or you can use printed document name as a file name.
You can add {{PAGE}}, {{DATE}}, {{TIME}}, {{JOB}} and {{IDENTITY}} tags to file name and path.
They will be replaced with current page number, current date, time, print job, and some unique
number respectively.
You can open result text with some application, let's say, with text viewer, or process
them with post-processor. To open every individual page with some software, check "Open with"
checkboxes. Specify complete path to the application in the "Open With"
textbox.For example, "Postprocessor" = "Notepad" will open result text file in Notepad.
To start the postprocessor for each page just add {{PAGE}} to output filename.
Each page will be saved to individual file. Postprocessor will be called for each file.
If all the pages are saved to a single file, postprocessor will be called once per document.
FTP
FTP plug-in sends text file to FTP server. Meanings of input fields:
- URL - URL to the resource; should contain server name and optional folder, without filename.
Example: ftp://www.yourcompany.com/publications
- File - filename for the saved file. It may contain {{PAGE}}, {{DATE}}, {{TIME}}, {{JOB}} and {{IDENTITY}} tags to be expanded.
- Passive mode checkbox. Check it if your server is behind a firewall.
- User and Password - login to your server. If not specified, plug-in will try to connect as anonimous.
HTTP
HTTP plug-in POSTs or PUTs text file to HTTP (Web) server.
You can switch between POST and PUT modes by Use PUT method checkbox.
If your PUT or POST location is password protected, use User and Password fields.
HTTP plug-in uses Basic authorization level.
If you use password protected saving, plug-in may sometimes send the file twice because most of servers decline the first connection attempt to protected resource.
URL and File fields have different meanings in PUT and POST modes:
PUT mode. URL should contain only server name and destination folder, as in FTP plug-in.
File is a name of destination file, optionally with {{PAGE}}, {{DATE}}, {{TIME}}, {{JOB}} and {{IDENTITY}} tags included.
To use this mode, Web server should support it, and it must be allowed (turned on) on the server.
POST mode. In this mode, URL should contain path to a script (ASP, ASPX, PHP, Perl, CGI or some other kind of active web page), which will receive POST web form from the plug-in.
Example: http://www.yourcompany.com/publications/post.asp.
Content of the form is encoded according multipart/form-data form rules. Form consists of the following two fields:
- File in expanded form is submitted under filename name as usual form field.
- Content (file itself) is submitted under content name as file form field (Content-Type: application/octet-stream).
So, the script should receive content and save it under filename name.
Please, note that writing to the web folder usually forbidden for scripts. Script should save content in location with special permissions (write allowed for web server virtual user).
Here is an example of form receiving script in asp with MSCUpload component:
<%@ LANGUAGE=JScript %>
<html>
<head>
<title>Test POST feature</title>
</head>
<body>
<%
var oUpload = Server.CreateObject("Miraplacid.MSCUpload");
oUpload.ProcessPostData();

var folder = Server.mapPath("/post");
var oBlob = Server.CreateObject("Miraplacid.MSCBlob");
oBlob.LoadFromFile(oUpload.Files("content").TmpPath);
oBlob.SaveToFile(folder+"/"+oUpload.Form("filename"));
%>
</body>
</html>
Printer
You can print the text file to a real printer.
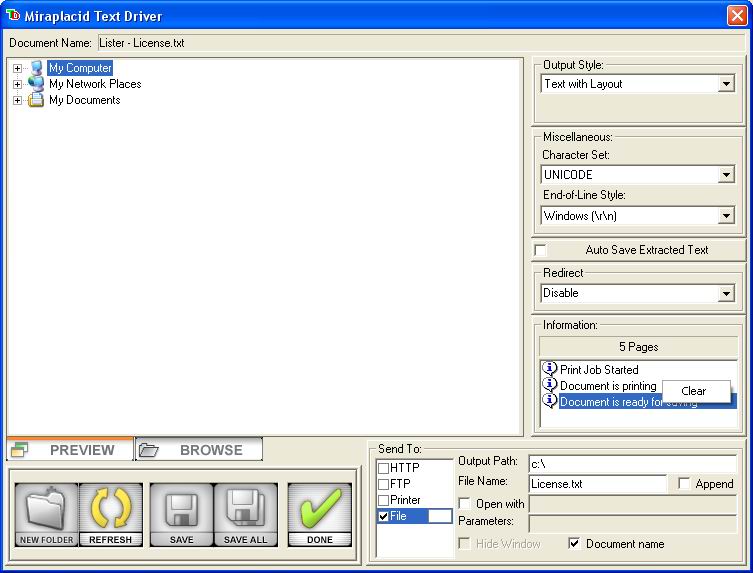
Refresh and New Folder
 
These buttons appear in Directory Browser mode. "Refresh"
refreshes directory tree.
"New Folder" create new subfolder in the currently selected folder.
Save and Save All
 
"Save" button saves current page to the specified file.
"Save All" button saves all the pages to the specified file and get prepared for the next document (see "Done" command below).
Done and Hide
 
When you are done with current document, click "Done" button.
If there is no pending printed documents, Miraplacid Text Driver will turn to Idle state.
Otherwise, first page of the next printed document will appear in the Preview window.
If there are no unprocessed printed documents, "Done" button become "Hide" button.
Minimize to Tray

Miraplacid Text Driver adds an icon to Windows System Tray. Right click the icon to open popup menu.
If there are no unprocessed printed documents, you can minimize Miraplacid Text Driver dialog with "Hide" button. Besides, you can hide the dialog at any point with button:

To restore the window, double click Miraplacid Text Driver tray icon or choose "Open" in the icon popup menu.
Auto Save Mode
If you want Miraplacid Text Driver to save all the extracted text to the specified file without your interaction, check "Auto Save Mode" checkbox on the dialog or in the Tray Icon popup menu. Current document and all the following documents will be auto-saved to the specified output file. If Auto Save Mode is off and there was idle and new document has been printed, Miraplacid Text Driver dialog appears on a screen. It does not happen when Auto Save Mode is turned on for your convenience.
See also:
|
|
|